Lyme Disease: The risk is out there. Is your dog protected?
Lyme disease affects dogs differently, and some may not display any clinical signs at all. In other dogs, many cases start with limping, swelling in the lymph nodes and fever and can progress to include loss of appetite and lethargy. It can also attack a dog’s joints and be very painful. These signs may not begin to show up until two to six months after the dog has contracted the disease. Antibiotics can help treat the disease, but does not eliminate the organism. Lyme disease is a recurring condition that can strike again and again once a dog contracts it.
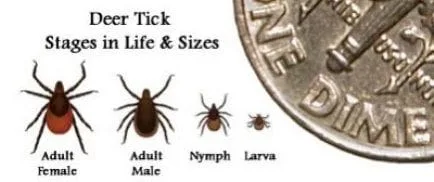
Certain tick species carry and transmit the bacteria that cause Lyme disease. The culprits in North America are the black-legged or deer tick and the western black-legged tick. Both are smaller than the other ticks other ticks found on pets in the U.S. To get a blood meal, a tick climbs onto low-growing vegetation and uses its forelegs to grab onto a passing host animal. If it is an infected host, such as a white-footed mouse, the tick ingests the bacteria in a blood meal and becomes an infective carrier without getting sick itself. The tick can retain the infection throughout its life cycle and give it to subsequent hosts, such as you or your dog. Usually, an infective tick must be attached 48 hours before transmission occurs.
There is no evidence that dogs can spread Lyme disease directly to their owners; however, dogs can bring infected ticks into the home or yard where the ticks may spread Lyme disease to people. According to the CDC, about 20,000 new human cases of Lyme disease are reported in the U.S. annually.
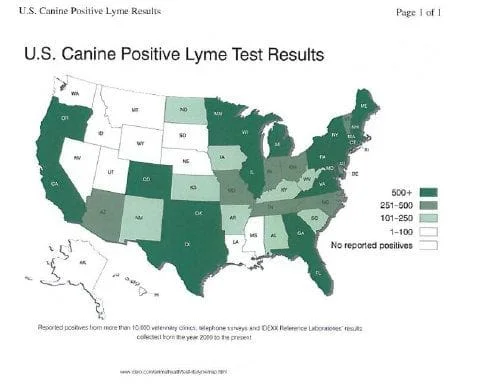
The ticks that carry Lyme disease are widespread. In fact, according to the Centers for Disease Control (CDC), Lyme disease is the most commonly reported tick-borne disease in the U.S. human population.
Lyme-positive dogs have been found in all 50 states.
To help protect your dog from Lyme disease:
The Lyme vaccine works by helping to block the transmission – from tick to dog – of the spirochete that causes Lyme disease.
Apply a topical tick control product monthly such as Advantix, apply a collar such as Seresto or give an oral medication monthly such as Nexgard.
Brush dogs frequently during tick season and conduct thorough tick checks.
Contact your veterinarian if you are concerned or are unable to remove the tick from your pet.
To help protect you from Lyme disease:
- Be vigilant when in wooded areas during tick season.
- Wear light-colored clothing to help you see and remove ticks before they attach.
- Wear a long-sleeved shirt tucked into long pants tucked into socks.
- Conduct frequent, full-body tick checks.
For more information, talk to your veterinarian and visit www.LymePrevention.com.
Step-by-Step Tick Removal Instructions:
Step 1—Don’t Bare-Hand It
Put on latex or rubber gloves so you’ll never have direct contact with the tick or your pet’s bite area. Ticks can carry infective agents that may enter your bloodstream through breaks in your skin or through mucous membranes (if you touch your eyes, nostrils or mouth).
Step 2—Grab a Partner
You don’t want your pet squirming away before you’re finished, so if possible, have a helper on hand to distract, soothe or hold her still.
Step 3—The Removal
Treat the bite area with rubbing alcohol and, using a pair of tweezers, grasp the tick as close to the animal’s skin as possible. Pull straight upwards with steady, even pressure. Place the tick in your jar.
- Do not twist or jerk the tick! This may leave the mouth-parts embedded in your pet, or cause the tick to regurgitate infective fluids.
- Do not squeeze or crush the body of the tick, because its fluids (saliva and gut contents) may contain infective organisms.
Step 4—All that Remains
Sometimes, in spite of doing everything right, a tick’s mouth-parts will get left behind in your pet’s skin. If the area doesn't appear red or inflamed, the best thing to do is to disinfect it and not to try to take the mouth-parts out. A warm compress to the area might help the body expel them, but do not go at it with tweezers.
Step 5—Clean Up
Thoroughly disinfect the bite site and wash your hands with soap and water (even though you were wearing gloves). Sterilize your tweezers with alcohol or by carefully running them over a flame.
Step 6—Keep Watch
Over the next few weeks, closely monitor the bite area for any signs of localized infection. If the area is already red and inflamed, or becomes so later, please bring your pet—and your jarred tick—to your veterinarian for evaluation.
Step 7-Getting rid of the tick
Dispose of a live tick by submersing it in alcohol, placing it in a sealed bag/container, wrapping it tightly in tape, or flushing it down the toilet. Never crush a tick with your fingers.
Avoid folklore remedies such as “painting” the tick with nail polish or petroleum jelly, or using heat to make the tick detach from the skin. The goal is to remove the tick as quickly as possible – not waiting for it to detach.